
Plastering walls
Posted by Neela Ngwenya in How To Guides
How to apply plaster to walls
Plastering needs practice and a good technique for perfect results. It is possible to tackle smaller areas with good results but leave ceilings to the professionals.
This is an advanced project and- you really need practice to get a good finish, but you’ve got to start somewhere…
YOU WILL NEED:
Plastering trowel hawk
bucket
larger mixing bucket
paddle accessory and power drill
paintbrush
Plaster mix
HERE’S HOW:
1. Clear the area of furniture and spread plenty of plastic sheeting over the floor. If you are plastering over new plasterboard, press joining tape over all the board joints and screw metal reinforcing angle bead to all external corners.
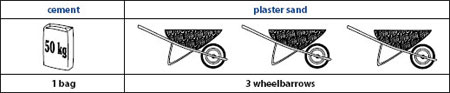
2. Mix your plaster according the instructions on the bag. Always add the plaster to the water and use a clean mixing bucket. It’s essential to mix the powder and water thoroughly so that you have a thickish, creamy consistency with no lumps. A paddle accessory fitted to a corded electric drill is the best method of mixing. Visit cnci.org.za for more information.
DIY Tip:
Plaster can set in minutes, especially in the summer, so only mix an amount you can use immediately. Don’t add new plaster to an older mix and don’t add water to the plaster to try and make it more workable.
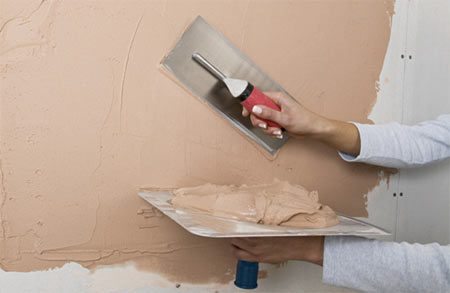
3. Scrape a trowel full of plaster off the mixing board and onto your hawk. Next, transfer half the plaster to your trowel. Keep your trowel wrist straight and use a flicking action with your ‘hawk hand’ to move the plaster from hawk to trowel.
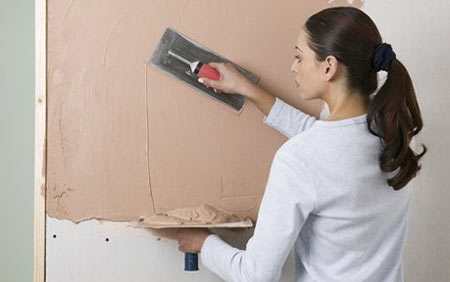
4. Working from the bottom of the wall, use smooth strokes to press the plaster onto the wall. Gradually narrow the gap between the trowel’s top edge and the wall as you move the tool upwards. Always keep the trowel at a slight angle to the wall at the end of the stroke. If the trowel is flattened against the surface it may pull the new plaster away from the wall.
5. Work over the whole area aiming to apply a base coat – don’t worry about any uneven areas or holes at this stage. This coat should be around 2mm thick.
DIY Tip:
Clean around the edges of the wall with a wet paintbrush to remove lumps and lines of plaster that are on the ceiling or adjacent walls.
6. The next stage is to level and smooth the surface but this can only be done when the plaster has hardened slightly but is still pliable. This working time will vary from a few minutes in summer to twenty minutes or more in very damp cold environments. Use your trowel at a very shallow angle to the wall and work over the surface smoothing the surface. You can add a thinner skim of more plaster to fill holes and even out depressions.
7. Leave the plaster to dry once more – for around thirty to forty minutes. Now the plaster can be polished. Wet the face of your trowel and flick water onto the wall with a large paintbrush. The idea is to provide just enough lubrication for your trowel to float over the surface and fill tiny holes and imperfections. Work in regular sweeping strokes and finish with long continuous strokes across the wall.
![]()
Comments
Add comment